Adding Google Tag Manager and Google Analytics to a Gatsby site
This document covers the following:
- Adding Google Tag Manager to your Gatsby site.
-
Adding Google Analytics to your Gatsby site, using Google Tag Manager.
- A simple configuration to track all pageviews on a site.
- Maintaining separate production and staging environments for Tag Manager + Analytics.
Table of Contents
Things to know before you begin
- It's recommended you review Deploying a Gatsby site to Firebase Hosting using GitHub Actions since most of what's covered below builds off of the information and configuration covered in that guide.
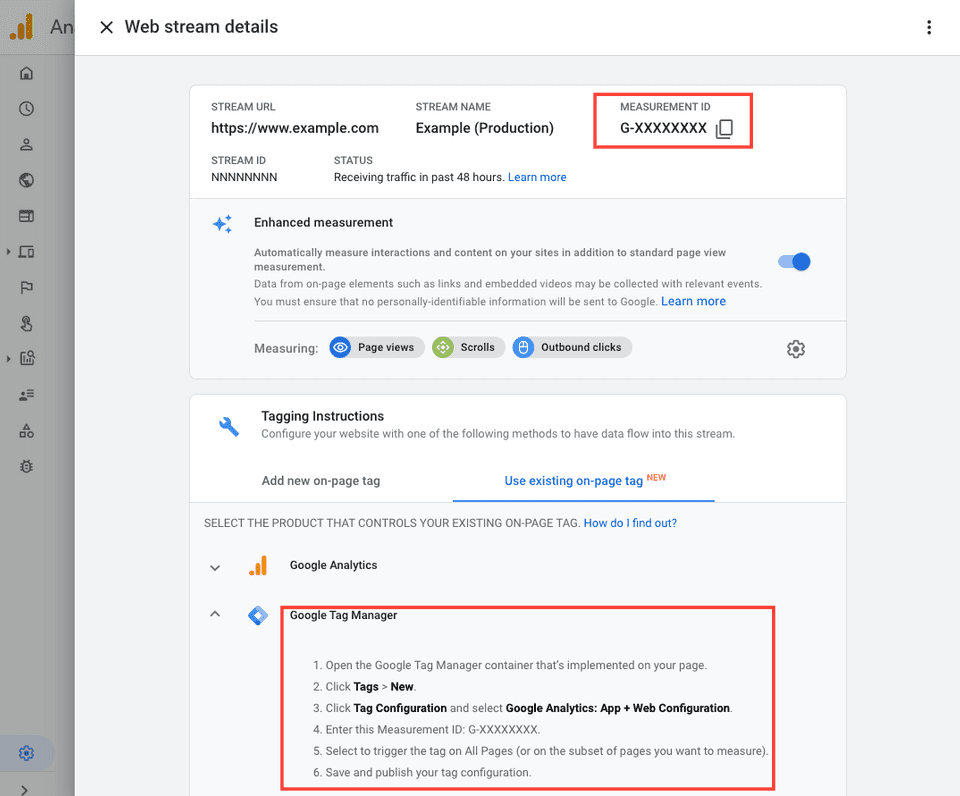
- This guide uses App + Web properties for Google Analytics tracking. App+Web properties have a Measurement ID which you will need to know when configuring Google Tag Manager.
- This guide does not cover details on how to use Tag Manager or Analytics. It only covers a simple, default configuration to track all pageviews on a site. To learn more about how these products work visit the Google Tag Manager Help Center and the Google Analytics Help Center.
1. Configure Google Analytics
You need 2 Google Analytics properties: one for measuring the staging version of your site and one for the production version.
-
Follow Get started with App + Web Analytics to learn how to create Analytics web properties.
- Create a staging property and note the Measurement ID. See Find your Measurement ID (App + Web properties) for help.
- Create a production property and note the Measurement ID.
- Optionally configure any of the Enhanced measurement features for your staging and production sites.
2. Configure Google Tag Manager
The Google Tag Manager Environments feature will be used to load different Google Tag Manager containers for separate staging and production versions of your site.
- In Google Tag Manager, Create a new account and container.
-
Follow Define environments and create a new custom environment named Staging.
- Note: The Live default environment will be used for your production site.
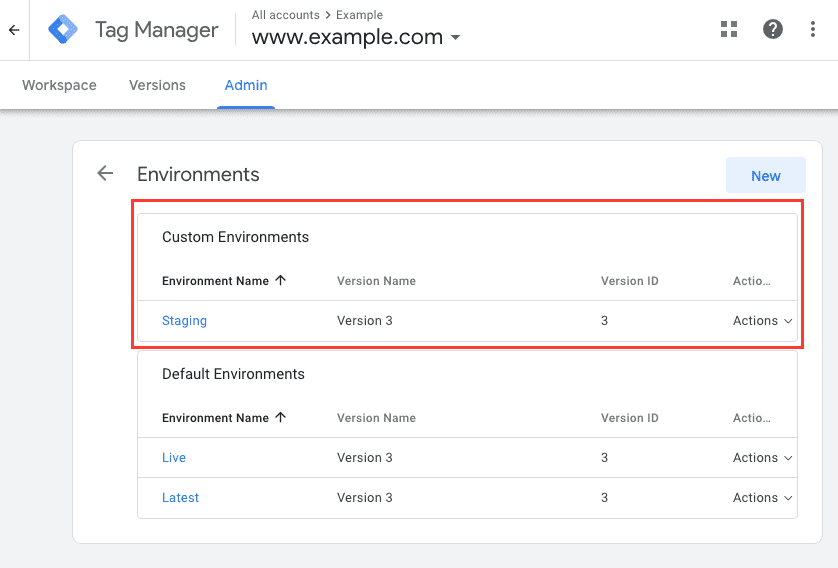
A custom staging environment in Google Tag Manager. -
Enable the built-in variable Environment Name .
- Note: This variable returns the user-provided name of the current environment. For the built-in environments, it returns "Live", "Latest", or "Now Editing". In all other cases it returns an empty string.
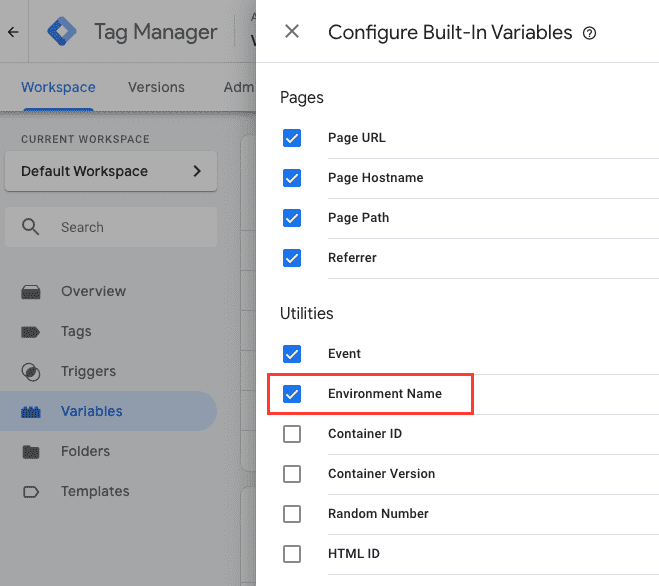
Enable the Environment Name variable in Google Tag Manager. -
Create user-defined variables to reference Google Analytics Measurement IDs
- Create a new variable named GA Measurement ID (Production) of type Constant and set the value of the variable to the Measurement ID for the production property you created in Google Analytics.
- Create a new variable named GA Measurement ID (Staging) of type Constant and set the value of the variable to the Measurement ID for the staging property you created in Google Analytics.
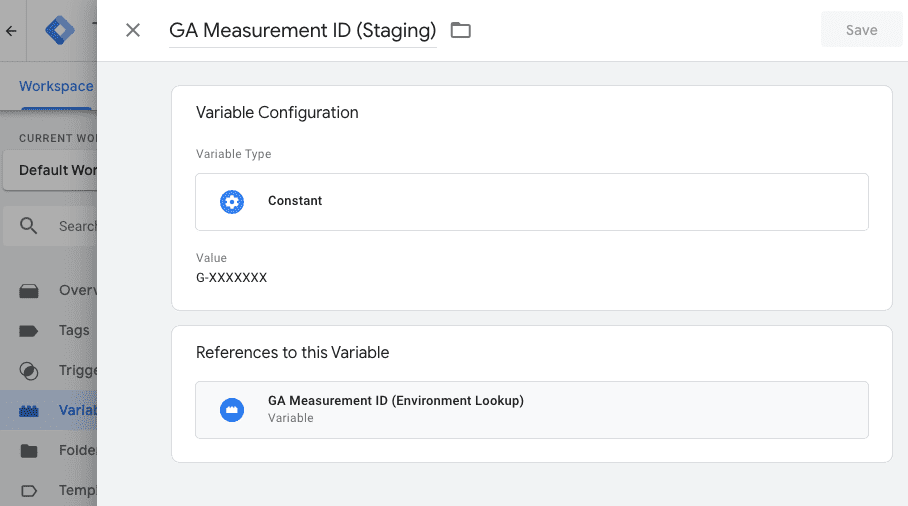
A user-defined variable to hold the Analytics Measurement ID for the staging environment. -
Create a user-defined variable to lookup Google Analytics Measurement IDs per environment
- Create a new variable named GA Measurement ID (Environment Lookup) of type Lookup Table.
- Set Input Variable to {{Environment Name}}.
- Add an input row and set Input to Staging and Output to the {{GA Measurement ID (Staging)}} variable.
- Click the Set Default Value checkbox and set the Default Value value to the {{GA Measurement ID (Production)}} variable.
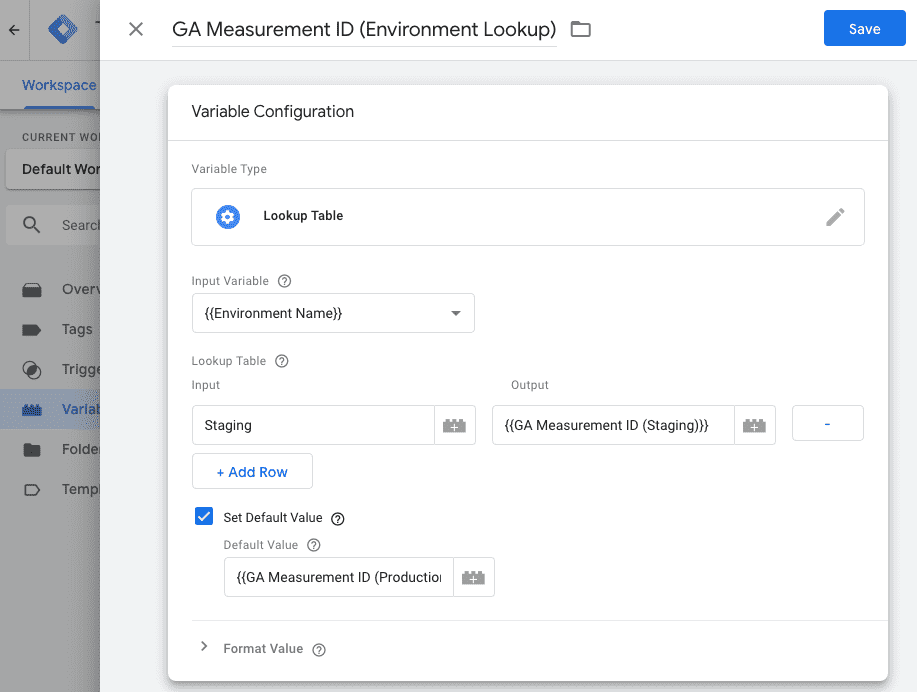
A user-defined variable to lookup Analytics Measurement ID based on the environment. -
Add the Google Analytics App+Web Tag
- From the container workspace, click Tags > New.
- Click Tag Configuration and select Google Analytics: App + Web Configuration.
- Set the value of Measurement ID to the variable {{GA Measurement ID (Environment Lookup)}}.
- Select to trigger the tag on All Pages (or on the subset of pages you want to measure).
- Save and publish your tag configuration.
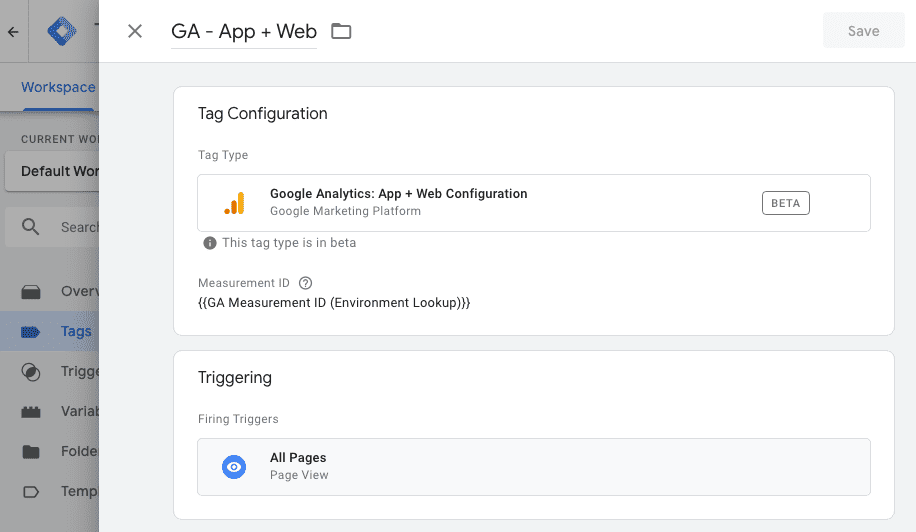
The Google Analytics App+Web tag configuration in Google Tag Manager using a lookup table for the Measurement ID.
3. Configure Gatsby with Google Tag Manager
Install the Google Tag Manager plugin
- Install gatsby-plugin-google-tagmanager.
-
Update your
gatsby-config.jswith the following:/** * The currently active environment. * This is used to set the corresponding Tag Manager environment config. */ const activeEnv = process.env.GATSBY_ACTIVE_ENV || process.env.NODE_ENV || "development" console.log(`Using environment config: '${activeEnv}'`) // The Tag Manager Container ID. const gtmContainerId = "YOUR_GOOGLE_TAGMANAGER_ID" /** * Tag Manager Environment values to configure gatsby-plugin-google-tagmanager. * null values will cause the default (live/production) snippet to load. */ const gtmEnv = { // If tag manager plugin is configured with includeInDevelopment set to // true then you should create a corresponding Development environment in // Tag Manager and replace the null values with the container environment // auth and preview values. Otherwise the production snippet will load. development: { gtmAuth: null, gtmPreview: null, }, staging: { gtmAuth: "YOUR_GOOGLE_TAGMANAGER_STAGING_ENVIRONMENT_AUTH_STRING", gtmPreview: "YOUR_GOOGLE_TAGMANAGER_STAGING_ENVIRONMENT_PREVIEW_NAME", }, // According to GTM docs you should use standard tag for prod so we'll set to null. production: { gtmAuth: null, gtmPreview: null, }, } plugins: [ { resolve: "gatsby-plugin-google-tagmanager", options: { id: gtmContainerId, includeInDevelopment: false, // GTM environment details. gtmAuth: gtmEnv[activeEnv].gtmAuth, gtmPreview: gtmEnv[activeEnv].gtmPreview, }, }, ] - In your
gatsby-config.jsset the value ofgtmContainerIdto your container ID. Find the ID by visiting your Google Tag Manager and click Workspace. Near the top of the window, find your container ID, formatted as "GTM-XXXXXX". - In your
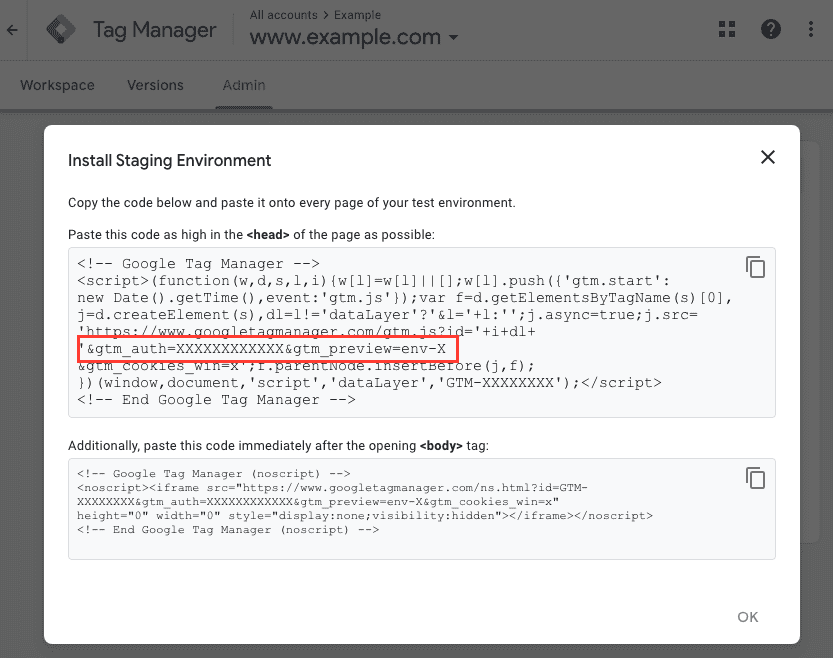
gatsby-config.jsset the value ofgtmEnv.staging.gtmAuth. To find the value, follow instructions to Get Snippet for the Staging environment. In the snippet preview find the>m_authquery parameter and use that value. - In your
gatsby-config.jsset the value ofgtmEnv.staging.gtmPreview. To find the value, follow instructions to Get Snippet for the Staging environment. In the snippet preview find the>m_previewquery parameter and use that value. It usually follows the patternenv-X.
Environment behaviors
As described in Environment Variables:
- When running
gatsby developorgatsby servethe environment is development. - When running
gatsby buildthe environment is production.
Set the GATSBY_ACTIVE_ENV environment variable to explicitly force an
environment. For example, to set staging as the active environment:
export GATSBY_ACTIVE_ENV=stagingNote: The main benefit of setting the environment is during build and deployment workflows, covered below.
Publish the Tag Manager container
It's important you publish the Tag Manager container for changes to take effect. See Publishing, versions, and approvals for details.
You need to publish and set the correct container version for each Tag Manager environment. The Live environment in Google Tag Manager corresponds to your production site. For example, if you make a change in Tag Manager that you want to apply to both your staging and production environments, publish your changes in Tag Manager and set the environment to Live. Then you will separately need to update the custom staging environment to the latest version by using the Publish To.. feature in the Environments section of Google Tag Manager (see Set Versions). Unfortunately, Google Tag Manager doesn't seem to allow publishing to multiple environments in one step.
Note: If an environment does not have any container published then when your site loads Google Tag Manager it may receive a 404 response.
4. (Optional) Set Environment in GitHub Actions workflows
If you've configured GitHub Actions workflows, for example to automatically Deploy a Gatsby site to Firebase Hosting, then you likely want the Google Tag Manager staging environment to load when building and deploying your staging site.
In GitHub Actions workflows you can do this by setting the GATSBY_ACTIVE_ENV
environment variable as part of the workflow.
-
Update the staging workflow YAML for your project to include
GATSBY_ACTIVE_ENV:.github/workflows/staging.ymlname: Staging Build and Deploy on: push: branches: - staging jobs: build-and-deploy: name: Build & Deploy runs-on: ubuntu-latest steps: - name: Checkout Repo uses: actions/checkout@master - name: Set up Node uses: actions/setup-node@v1 with: node-version: "12.x" - name: Build Site run: | npm install npm run build env: GATSBY_ACTIVE_ENV: "staging" - name: Deploy to Firebase uses: w9jds/firebase-action@master with: args: deploy --only hosting:staging env: FIREBASE_TOKEN: ${{ secrets.FIREBASE_TOKEN }} -
Update the production workflow YAML for your project to include
GATSBY_ACTIVE_ENV:.github/workflows/production.ymlname: Production Build and Deploy on: push: branches: - master jobs: build-and-deploy: name: Build & Deploy runs-on: ubuntu-latest steps: - name: Checkout Repo uses: actions/checkout@master - name: Set up Node uses: actions/setup-node@v1 with: node-version: "12.x" - name: Build Site run: | npm install npm run build env: GATSBY_ACTIVE_ENV: "production" - name: Deploy to Firebase uses: w9jds/firebase-action@master with: args: deploy --only hosting:production env: FIREBASE_TOKEN: ${{ secrets.FIREBASE_TOKEN }} -
Commit these changes and push them to your master and staging branches.
- Note: Pushing the commit to add the workflows will itself cause the workflows to execute. You can see the output of the workflow execution in the Actions tab of your GitHub project.