Deploy a Gatsby site to Firebase Hosting using GitHub Actions
So you've built a site using Gatsby, great! Learn how to maintain and automate the deployment of your site from GitHub to Firebase Hosting for both staging and production environments.
Before you begin
This article does not cover how to use git or maintain a project on GitHub, including working with branches and pushing changes to GitHub. There is a lot of information available on these topics, such as how to add projects to GitHub and Pushing commits to a remote repository.
Learn more about Firebase Hosting and GitHub Actions.
Table of Contents
Overview: The development workflow and configuration
The development workflow
After following this guide, your development and deployment workflow will look as follows:
- Develop your Gatsby site locally and commit changes as usual.
- In preparation for staging, merge your local commits into the staging branch.
-
git pushthe staging branch to your Github repo.- On push, a GitHub Actions workflow will be activated to automatically build your site from the remote staging branch and deploy to your staging site on Firebase Hosting.
-
Once you've tested your changes on the staging site, deploy to production by merging the staging branch into the master branch and
git pushthe master branch (alteratively merge any commits you want into master and push to have them deployed to production).- On push, a GitHub Actions workflow will be activated to automatically build your site from the remote master branch and deploy to your production site on Firebase Hosting.
The configuration
To automate your deployment workflow, the main components you will configure are as follows:
-
A GitHub repo for your Gatsby site source files.
- The default master branch will be used for the production version of your site.
- A staging branch will be used for the test/staging version of your site. You'll be able to independently build and deploy the staging branch so that you can test/preview changes before releasing to production.
-
A Firebase project for web hosting.
- Using Firebase Hosting, your project will have 2 sites: staging and production.
- The master branch of your GitHub project will deploy to the production site and the staging branch will deploy to the staging site.
-
GitHub Actions workflows to build and deploy from your GitHub repo to your Firebase project.
- 2 separate workflows will be used to independently build and deploy your staging and production site.
1. Configure the GitHub project
You should already have a GitHub project/repo for your gatsby site and be familiar with how to commit and push changes from your local development environment to your GitHub project.
-
The master (default) branch will be the production version of your site.
- Any push to the master branch will be deployed to the production version of your site on Firebase Hosting.
-
Create a branch in your repo and name it staging.
- Any push to the staging branch will be deployed to the staging version of your site on Firebase Hosting.
Learn about Pushing commits to a remote repository.
2. Configure Firebase Hosting
Initial setup
- Create a Firebase project
- Follow Deploying to Firebase Hosting to learn how to deploy your Gatsby site to Firebase Hosting.
- Try deploying your site to Firebase (run
firebase deploy) to make sure everything is working as expected before proceeding.
Add a staging site to your Firebase project.
-
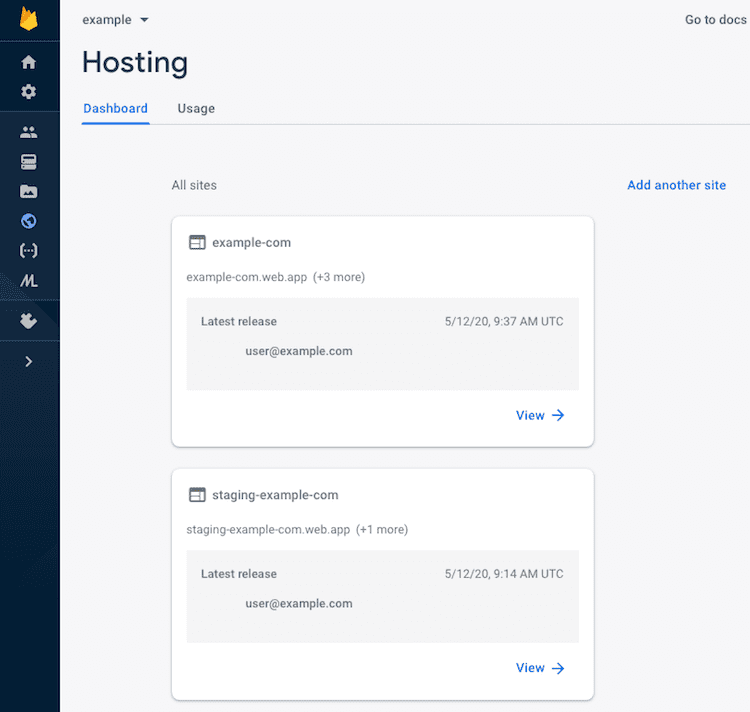
Add another site to your Firebase project. This will be for the staging version of your site. Follow Add a site to your Firebase Hosting project for details on how to do this.
- Prefix the name of the site with staging. E.g. staging-example-com.
- You should now have 2 sites in your Firebase project, one for the production version and one for staging.

Configure the Gatsby project for Firebase staging and production deployments
-
Navigate into your gatsby project directory and use the Firebase CLI to apply a deploy target for staging and production sites. Execute the the following commands:
firebase target:apply hosting production example-com
firebase target:apply hosting staging staging-example-com
Replace example-com and staging-example-com with your Firebase site production and staging IDs.
-
In the root of your gatsby project, update
firebase.jsonto use the production and staging targets. Duplicate the recommended cache settings for each target and include atargetproperty as follows:{ "hosting": [ { "target": "staging", "public": "public", "ignore": ["firebase.json", "**/.*", "**/node_modules/**"], "headers": [ { "source": "**/*", "headers": [ { "key": "cache-control", "value": "cache-control: public, max-age=0, must-revalidate" } ] }, { "source": "static/**", "headers": [ { "key": "cache-control", "value": "public, max-age=31536000, immutable" } ] }, { "source": "**/*.@(css|js)", "headers": [ { "key": "cache-control", "value": "public, max-age=31536000, immutable" } ] }, { "source": "sw.js", "headers": [ { "key": "cache-control", "value": "cache-control: public, max-age=0, must-revalidate" } ] }, { "source": "page-data/**", "headers": [ { "key": "cache-control", "value": "cache-control: public, max-age=0, must-revalidate" } ] } ] }, { "target": "production", "public": "public", "ignore": ["firebase.json", "**/.*", "**/node_modules/**"], "headers": [ { "source": "**/*", "headers": [ { "key": "cache-control", "value": "cache-control: public, max-age=0, must-revalidate" } ] }, { "source": "static/**", "headers": [ { "key": "cache-control", "value": "public, max-age=31536000, immutable" } ] }, { "source": "**/*.@(css|js)", "headers": [ { "key": "cache-control", "value": "public, max-age=31536000, immutable" } ] }, { "source": "sw.js", "headers": [ { "key": "cache-control", "value": "cache-control: public, max-age=0, must-revalidate" } ] }, { "source": "page-data/**", "headers": [ { "key": "cache-control", "value": "cache-control: public, max-age=0, must-revalidate" } ] } ] } ] } -
The following commands can be executed to deploy your site to Firebase Hosting:
To deploy to staging only run:
firebase deploy --only hosting:stagingTo deploy to production only run:
firebase deploy --only hosting:productionTo deploy to production and staging run:
firebase deployNote: We'll automate this later so that your site is automatically deployed to staging or production from GitHub.
3. Configure GitHub Actions
2 workflows will be used to separately build and deploy your site to production and staging sites on Firebase Hosting.
-
Generate a Firebase token
The GitHub Actions workflow requires authorization to deploy to your Firebase project. Firebase has provided a way to generate a token to authenticate and login when executing the deploy command from a workflow. To generate a Firebase token execute the following command and follow the instructions:
firebase login:ci
Generate a token using the Firebase CLI. -
Add the Firebase token as a secret in GitHub
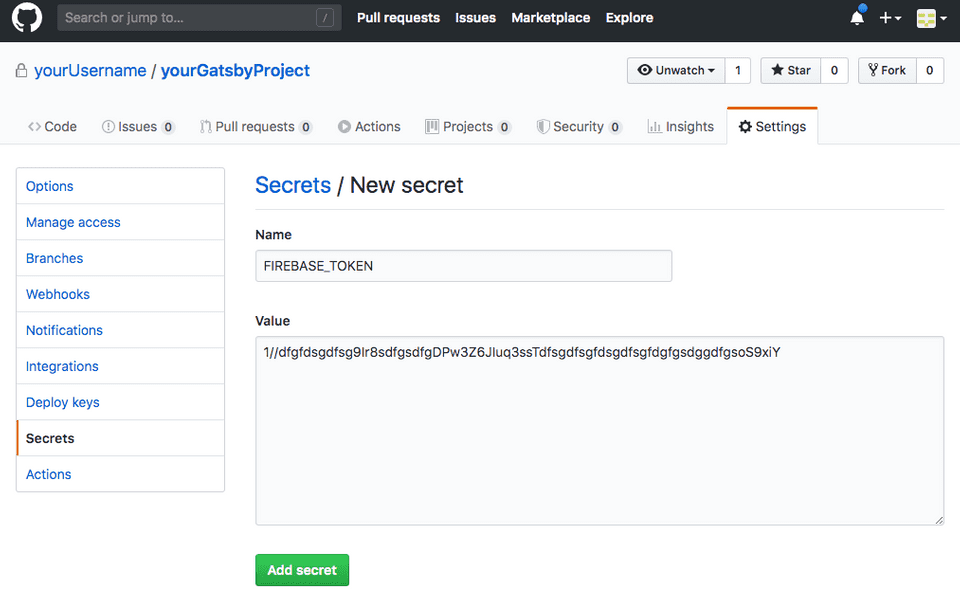
Follow the instructions for Creating and storing encrypted secrets on GitHub. Add your previously generated Firebase token to your project as a secret, use the name
FIREBASE_TOKEN.
Add the Firebase Token as a secret named FIREBASE_TOKEN in your GitHub project. -
Add the production and staging workflows
Workflows will be used to automate the process of building and deploying your gatsby site from GitHub to Firebase Hosting. The workflows will run whenever a change is pushed to either the master or staging branch of your GitHub project. Read Configuring a workflow to learn more about GitHub workflows.
The only difference between the production and staging workflows below are the branch push that will trigger the workflow and the Firebase Hosting site to deploy to. The workflows rely on the following GitHub Actions:
- Checkout - checks-out your repository so that your workflow can access it.
- Setup Node.js environment
- GitHub Action for Firebase - enables arbitrary actions with the firebase command-line client.
Note: You must store workflows in the
.github/workflowsdirectory in the root of your repository.-
Add the staging workflow YAML file to your project:
.github/workflows/staging.ymlname: Staging Build and Deploy on: push: branches: - staging jobs: build-and-deploy: name: Build & Deploy runs-on: ubuntu-latest steps: - name: Checkout Repo uses: actions/checkout@master - name: Set up Node uses: actions/setup-node@v1 with: node-version: "12.x" - name: Build Site run: | npm install npm run build - name: Deploy to Firebase uses: w9jds/firebase-action@master with: args: deploy --only hosting:staging env: FIREBASE_TOKEN: ${{ secrets.FIREBASE_TOKEN }} -
Add the production workflow YAML file to your project:
.github/workflows/production.ymlname: Production Build and Deploy on: push: branches: - master jobs: build-and-deploy: name: Build & Deploy runs-on: ubuntu-latest steps: - name: Checkout Repo uses: actions/checkout@master - name: Set up Node uses: actions/setup-node@v1 with: node-version: "12.x" - name: Build Site run: | npm install npm run build - name: Deploy to Firebase uses: w9jds/firebase-action@master with: args: deploy --only hosting:production env: FIREBASE_TOKEN: ${{ secrets.FIREBASE_TOKEN }} -
Commit these changes and push them to your master and staging branches.
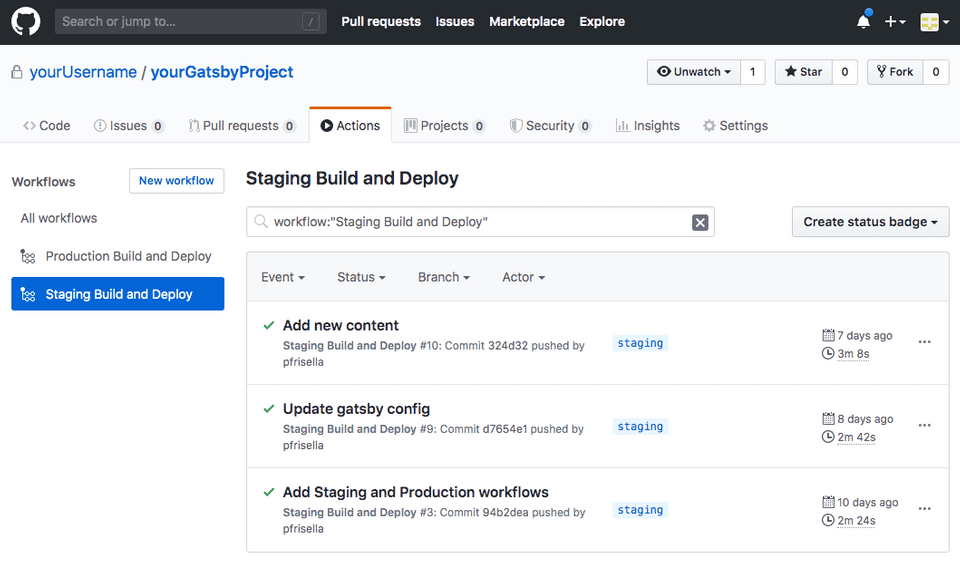
- Note: Pushing the commit to add the workflows will itself cause the workflows to execute. You can see the output of the workflow execution in the Actions tab of your GitHub project.
4. Push changes and test workflows
Changes pushed to the staging or master branch will now trigger the corresponding staging or production GitHub Actions workflow.
Try out your new workflow:
- From your local development environment, within the staging branch, make a change.
- Commit and push the change to the staging branch.
- The staging workflow will execute and your updated site will automatically build and deploy to your staging site on Firebase Hosting.
-
Production: To deploy your changes to production, switch to the master branch and merge changes from the staging branch (or any other branch you wish to deploy to production). Push the master branch, the production workflow will execute and your updated site will be automatically built and deployed to your production site on Firebase Hosting.
For example, a push to production would look as follows:
git checkout master
git merge staging
git push
Note: Workflow versions are dependent on the branch you are pushing to. For example, when you push changes to the staging branch, the staging.yml workflow from the staging branch is executed, not the staging workflow from the master branch. It also means when you push a change to a branch that includes a workflow change, the new workflow you've pushed will be immediately executed by GitHub.

Next: Adding Google Tag Manager and Google Analytics to a Gatsby site